
Have you ever wondered about the secrets of The Pioneer Kitchen? It wasn’t about fancy gadgets or complicated recipes, but about the simple satisfaction of creating wholesome food from scratch. In today’s fast-paced world, rediscovering these traditional skills can be incredibly rewarding. This week, I decided to step back in time and explore a cornerstone of the pioneer kitchen: homemade butter. Inspired by tales of early American life and a craving for real, unadulterated flavor, I embarked on a surprisingly easy butter-making adventure right in my modern kitchen.
Simple Steps to Creamy Homemade Butter
Forget store-bought tubs – crafting your own butter is not only simpler than you think but also a delicious way to connect with food origins. You don’t need a butter churn or any specialized equipment, just a few basic ingredients and a little patience. Here’s how to bring a touch of the pioneer kitchen to your home.
Ingredients for Pioneer-Style Butter
You only need two key ingredients to unlock the rich taste of homemade butter:
- 1 quart of heavy cream
- ¾ teaspoon of salt (optional, but enhances flavor)
Step-by-Step Butter Making Guide
Let’s transform heavy cream into luscious butter using a stand mixer – a modern convenience that would have been the envy of any pioneer!
-
Pour and Prepare: Begin by pouring the heavy cream into your stand mixer bowl. For a cleaner experience, especially as things get splashy, consider using a towel draped over the mixer.
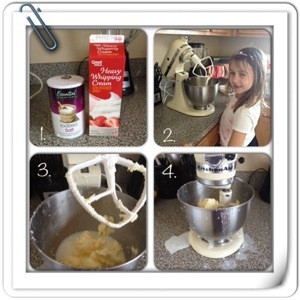 Heavy cream being poured into a stand mixer bowl
Image alt text: Preparing to make homemade butter in a pioneer kitchen style; heavy cream is poured into a stand mixer bowl by a child helper.
-
Mix and Observe: Turn your mixer on to medium-high speed. Initially, you’ll witness the cream transforming into whipped cream. Don’t stop here! Continue mixing, and you’ll notice the mixture starting to separate. Tiny butter granules will begin to form, and buttermilk will separate from the fat. This is the magic happening right before your eyes!
-
Separation Stage: The mixture will thicken and look curdled as the butterfat separates from the buttermilk. This is exactly what you want to see. Keep mixing until the butter clumps together and the buttermilk is distinctly separated.
-
Drain the Buttermilk: Once the butter has formed, it’s time to drain off the buttermilk. Pour the contents of the mixer bowl through a colander or fine-mesh sieve placed over another bowl. This will separate the butter from the liquid buttermilk.
-
Rinse and Refine: Rinsing the butter under cold water is a crucial step to remove any remaining buttermilk. This step enhances the butter’s flavor and extends its shelf life. Gently knead the butter under cold running water until the water runs clear. This ensures all buttermilk is washed away.
-
Salt to Taste (Optional): If desired, sprinkle the salt over the butter and knead it in evenly. Salt not only enhances the flavor but also acts as a preservative.
-
Store and Savor: Your homemade butter is now ready! Store it in an airtight container in the refrigerator. Freshly made butter typically lasts for about 3-4 weeks.
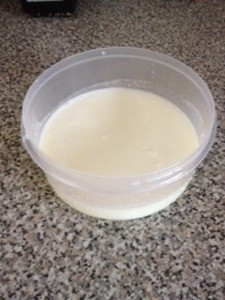 Freshly made homemade butter ball in a glass container
Image alt text: A ball of freshly churned homemade butter, a testament to pioneer kitchen simplicity, stored in a clear glass container in a refrigerator.
Tips for a Pioneer Kitchen Butter Success
- Temperature Matters: Ensure your heavy cream is cold for optimal butter formation.
- Minimize the Mess: While a towel draped over the mixer helps, be prepared for some splatter, especially at higher speeds. Starting at a lower speed and gradually increasing it can help reduce mess.
- Embrace the Process: Making butter is a hands-on experience. Don’t be afraid to get your hands a little greasy – it’s all part of the pioneer kitchen charm!
The Taste of Tradition in Your Modern Kitchen
What truly sets homemade butter apart is the taste. It’s richer, creamier, and simply tastes more like… well, butter! This simple act of transforming cream into butter connects us to a time when food was made with intention and care, much like in the pioneer kitchen stories we read. While pioneers relied on butter churns and sheer elbow grease, we can achieve the same delicious result with modern tools. Thinking about the effort involved in traditional butter making truly underscores the convenience we enjoy today, while still allowing us to appreciate the fundamental goodness of homemade food.
And don’t forget about the buttermilk! This byproduct of butter making is a treasure trove for baking and cooking. If you’re looking for ways to use your fresh buttermilk, think pancakes, biscuits, or even marinades.
 Close-up of freshly made homemade butter showing texture
Image alt text: Detailed view of homemade butter texture, highlighting the quality and freshness achievable in a pioneer kitchen setting with simple ingredients.
Embrace Your Inner Pioneer Baker
Making homemade butter is more than just a recipe; it’s a journey back to the basics, a nod to the resourceful spirit of the pioneer kitchen, and a delicious way to elevate your everyday meals. So, why not try it yourself? You might be surprised at how easy and satisfying it is to create this kitchen staple from scratch. Have you ever made homemade butter? Share your experiences and favorite buttermilk recipes in the comments below!