Regular maintenance is crucial for keeping your Honda Pioneer 700 running smoothly and reliably, and one of the most fundamental tasks is changing the engine oil. Whether you’re a seasoned off-roader or new to the world of Side-by-Sides (SxS), performing a Honda Pioneer 700 Oil Change yourself is a straightforward process that can save you money and ensure your machine is always ready for the trail. This guide will walk you through each step, providing clear instructions and helpful tips to make your DIY oil change a success.
Tools and Materials You’ll Need
Before you begin, gather all the necessary tools and parts. Having everything ready will make the oil change process quicker and more efficient. Here’s what you’ll need:
- Socket Wrench: Essential for loosening and tightening bolts.
- Sockets:
- 10mm socket: For the maintenance lid bolts.
- 12mm socket: For the oil filter cover bolt.
- 17mm socket: For the oil drain plug.
- Torque Wrench: Crucial for tightening bolts to the correct specifications, preventing damage and ensuring a proper seal.
- Funnel: For pouring new oil into the engine without spills.
- Oil Pan: To collect the old oil. Make sure it’s large enough to hold at least 3.1 quarts of oil.
- Paper Towels or Lint-Free Rags: For wiping up spills and cleaning parts.
- New Oil Filter: Honda Part # 15412-KEA-003 or a compatible aftermarket filter like KN-111. Using a quality oil filter is vital for engine health.
- New Engine Oil: 3.1 quarts of Honda GN4 4-stroke 10W-30 oil, or another oil that meets Honda’s specifications. Many riders prefer full synthetic oils like Mobile 1 Racing 4T 10W-40 for enhanced engine protection. Always check your owner’s manual for recommended oil types and viscosities.
Step-by-Step Honda Pioneer 700 Oil Change Guide
Follow these steps to perform a complete oil change on your Honda Pioneer 700. Remember to always consult your Honda Pioneer 700 owner’s manual for specific instructions and safety precautions.
1. Prepare Your Pioneer 700
- Warm Up the Engine: Run your Honda Pioneer 700 for a few minutes (3-5 minutes is usually sufficient). Warming the oil makes it flow more easily, allowing for a more complete drain of the old, contaminated oil. Be careful not to overheat the engine; a slightly warm engine is ideal.
- Park on a Level Surface: Choose a flat, stable location to park your Pioneer 700. This ensures all the old oil drains out properly and provides a safe working environment.
- Engage Parking Brake and Remove Key: For safety, firmly set the parking brake and remove the ignition key to prevent accidental starts or movement during the oil change.
- Remove the Front Seat: Take out the driver’s side front seat and place it in the bed of your Pioneer for easier access to the engine maintenance areas.
- Access Engine Maintenance Flaps: Locate the rubber engine access flaps underneath where the seat was positioned and fold them back to expose the maintenance areas.
2. Accessing the Drain Plug and Oil Filter
- Locate the Dipstick and Filler Cap: The dipstick is located on the driver’s side of the engine. Unscrew and remove it. Also, loosen the oil filler cap. This venting process helps the old oil drain out more smoothly.
- Elevate the Front (Optional): If you need more room to work underneath your Pioneer 700, you can safely elevate the front tires using ramps or sturdy blocks. This can also aid in more complete oil drainage.
- Access the Maintenance Lid: Slide underneath the front of the Pioneer 700 to locate the maintenance lid on the driver’s side, which provides access to the oil drain plug.
Alt text: Location of the maintenance lid under a Honda Pioneer 700, providing access to the oil drain plug for an oil change.
- Remove the Maintenance Lid: Use your 10mm socket and ratchet to remove the four bolts securing the maintenance lid. Carefully set the bolts aside. Slide the lid to the side to expose the oil drain plug. Avoid completely removing the lid from the maintenance hole to simplify reinstallation.
Alt text: Honda Pioneer 700 with the maintenance lid slid aside to reveal the 17mm oil drain plug ready for removal during an oil change.
3. Draining the Old Engine Oil
- Position the Oil Pan: Place your oil pan directly beneath the exposed oil drain plug.
- Remove the Drain Plug: Use your 17mm socket and wrench to loosen and then carefully remove the oil drain plug. Let the old oil drain completely into the oil pan. Be patient; allow several minutes for a thorough drain.
Alt text: Old engine oil draining from the Honda Pioneer 700 oil drain plug into a black oil pan during a routine oil change.
4. Inspect and Reinstall the Drain Plug
- Inspect the Drain Plug: While the oil is draining, take a moment to inspect the drain plug. Clean off any debris with a rag or paper towel. Check the condition of the rubber seal and washer on the drain plug. Replace them if they appear worn or damaged to prevent leaks.
Alt text: Close up inspection of the Honda Pioneer 700 oil drain plug, held in hand, for wear and tear on the washer and rubber seal before reinstallation.
- Prepare the Drain Plug: Apply a light coating of fresh, new engine oil to the rubber seal and washer on the drain plug. This helps create a better seal and prevents the seal from sticking or tearing.
Alt text: Fingers applying a thin coat of fresh engine oil to the rubber seal of a Honda Pioneer 700 oil drain plug to ensure a proper seal.
- Reinstall and Torque the Drain Plug: Once the old oil has finished draining, get back under the Pioneer. Reinstall the drain plug by hand, turning it clockwise until it’s snug. Then, use your torque wrench and 17mm socket to tighten the drain plug to the specified torque of 18 lbf-ft (25 Nm). Proper torque is crucial to prevent leaks and damage to the engine case.
Alt text: Using a socket wrench to tighten the oil drain plug on a Honda Pioneer 700 to the manufacturer-recommended torque specification.
- Reinstall the Maintenance Lid: Slide the maintenance lid back into its original position and reinstall the four bolts. Tighten these bolts to the specified torque of 9 lbf-ft (12 Nm) using your torque wrench and 10mm socket.
5. Replacing the Oil Filter
- Access the Oil Filter Cover: Move to the passenger side of your Pioneer 700. Position your oil pan under the maintenance hatch on this side, near where a passenger’s inboard leg would be. Locate the internal oil filter cover.
- Remove the Oil Filter Cover Bolt: Use your 12mm socket and ratchet to loosen and remove the bolt securing the oil filter cover. Be prepared for some residual oil to drip out when you remove the cover.
Alt text: Removing the 12mm bolt from the Honda Pioneer 700 oil filter cover on the passenger side of the vehicle to access the oil filter.
- Remove the Old Oil Filter: Once the bolt is loose, the entire oil filter unit should slide out. Warning: Carefully remove the old filter from the filter bolt assembly. Check for a small flat washer that often sticks to the old filter and ensure it is not discarded with the old filter. You’ll need this washer for the new filter.
Alt text: Removing the used oil filter from the filter bolt assembly of a Honda Pioneer 700 during the oil change process.
- Compare Old and New Filters: Briefly compare the old filter with the new one to ensure they are the same type and size.
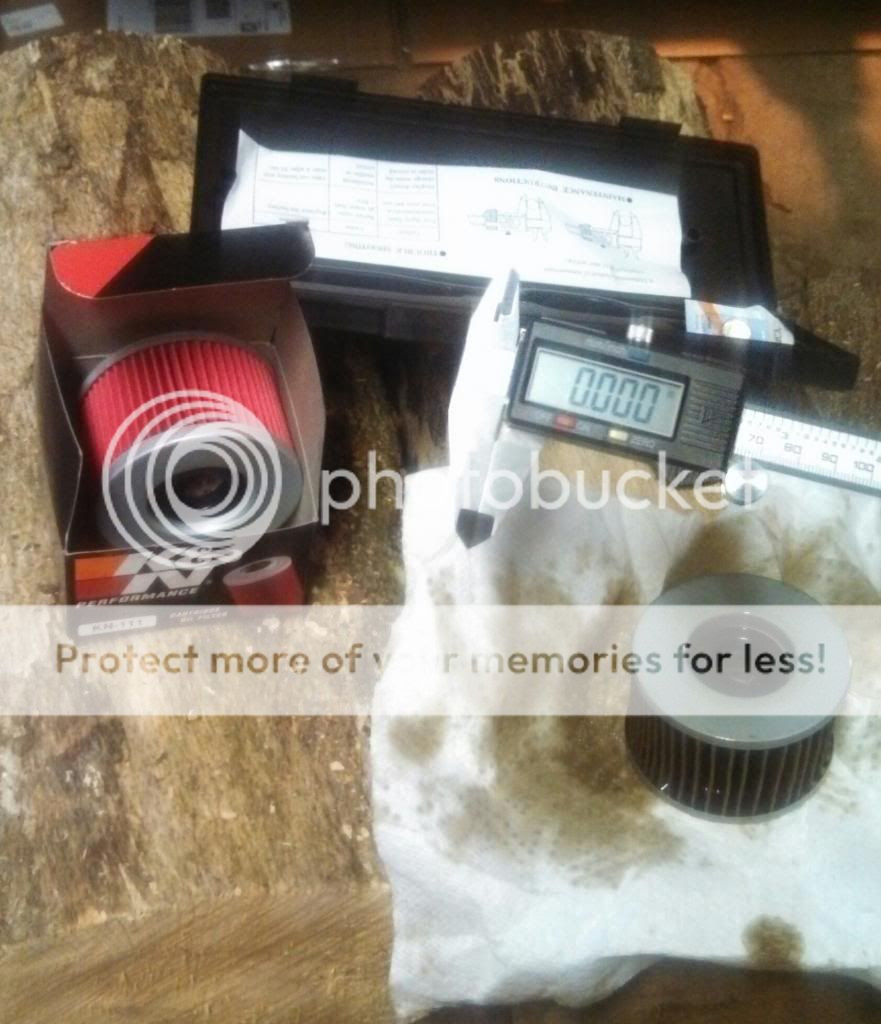 Comparing old and new oil filters for Honda Pioneer 700
Alt text: Side-by-side comparison of a used, dirty oil filter and a clean, new oil filter intended for a Honda Pioneer 700.
- Install the New Oil Filter: Slide the new oil filter onto the filter bolt assembly, ensuring the flat washer is in place if applicable. Slide the assembly back into the engine.
Alt text: Installing a new oil filter onto the filter bolt assembly of a Honda Pioneer 700 during routine maintenance.
- Reinstall and Torque the Filter Bolt: Hand-tighten the oil filter bolt, then use your torque wrench and 12mm socket to tighten it to the specified torque of 13 lbf-ft (18 Nm).
6. Adding New Engine Oil
-
Add New Oil Slowly: With both the drain plug and oil filter housing securely tightened, it’s time to add new engine oil. Refer to your owner’s manual for the exact oil capacity, which is typically around 3.1 quarts (approximately 3 quarts and 3.2 ounces) for a Honda Pioneer 700 oil change. Important: Pour the new oil in slowly using a funnel to avoid spills. Adding oil too quickly can cause it to overflow before it flows down into the engine.
-
Check the Dipstick: Screw in the dipstick and tighten the oil filler cap.
-
Start the Engine: Ensure all tools, rags, and the oil pan are clear of the engine and moving parts. Start your Honda Pioneer 700 engine and let it run for about 30 to 60 seconds. This circulates the new oil throughout the engine and into the new oil filter.
-
Turn Off Engine and Check Oil Level: Shut off the engine and wait a few minutes to allow the oil to settle back into the oil pan. Check the oil level using the dipstick. Wipe the dipstick clean, reinsert it fully, and then remove it again to get an accurate reading. The oil level should be between the minimum and maximum lines on the dipstick. If necessary, add a little more oil to reach the correct level.
Alt text: Checking the engine oil level on a Honda Pioneer 700 using the dipstick after completing an oil change.
7. Final Steps
- Reinstall Access Panels and Seat: Fold the rubber engine access panels back into their closed positions to protect the engine components. Reinstall the front seat you removed earlier.
- Dispose of Old Oil Properly: Take the used oil to a recycling center or auto parts store that accepts used oil for proper disposal. Never pour used oil down drains or onto the ground.
- Check for Leaks: After your first ride, and periodically thereafter, check around the drain plug and oil filter area for any signs of leaks.
Congratulations! You’ve successfully completed an oil change on your Honda Pioneer 700. Regular oil changes, as recommended in your owner’s manual, will help extend the life of your engine and keep your Pioneer performing at its best for years to come.