Intel Virtualization Technology (VT) empowers you to run multiple operating systems on a single physical machine. Are you looking to enable Intel VT for enhanced performance? This comprehensive guide will walk you through the process, ensuring you can leverage the full potential of your hardware. At pioneer-technology.com, we strive to provide cutting-edge insights into technological advancements, making complex concepts accessible to everyone. Explore virtualization capabilities, understand CPU virtualization, and optimize system performance with us.
1. What is Intel Virtualization Technology (VT)?
Intel Virtualization Technology (VT), also known as Intel VT-x, is hardware-assisted virtualization that enhances a computer’s ability to run virtual machines (VMs) more efficiently. In essence, yes, Intel VT allows a single physical machine to operate multiple operating systems and applications in isolated environments. VT improves resource management, security, and overall system performance by enabling the CPU to handle virtualization tasks more effectively.
To elaborate, the advent of virtualization has transformed how computing resources are utilized. Rather than dedicating a physical server to each application or operating system, virtualization allows multiple virtual machines to run on a single physical host. This not only optimizes hardware usage but also streamlines IT management, reduces costs, and enhances scalability.
1.1 Key Benefits of Intel VT
- Improved Performance: VT reduces the overhead associated with virtualization, allowing virtual machines to run faster and more efficiently.
- Enhanced Security: Virtual machines are isolated from each other, preventing one VM from interfering with others and improving overall system security.
- Better Resource Management: VT enables better allocation and utilization of CPU resources among virtual machines, ensuring optimal performance.
- Increased Compatibility: VT enhances compatibility with various virtualization platforms and operating systems, making it easier to deploy and manage virtual environments.
- Cost Savings: By enabling more efficient use of hardware resources, VT helps reduce the number of physical servers needed, leading to significant cost savings.
1.2 Use Cases for Intel VT
- Software Development and Testing: Developers can use VT to create isolated environments for testing applications on different operating systems and configurations.
- Server Consolidation: VT allows businesses to consolidate multiple physical servers into fewer, more powerful machines, reducing hardware costs and simplifying management.
- Cloud Computing: VT is a fundamental technology in cloud computing, enabling providers to offer virtualized resources to customers on demand.
- Gaming: Gamers can use VT to run multiple instances of games or test mods in a safe, isolated environment.
- Security Analysis: Security professionals can use VT to analyze malware and other threats in a controlled environment without risking their primary system.
2. Why Enable Intel VT? Understanding the Advantages
Enabling Intel VT is crucial for anyone looking to maximize their system’s capabilities for virtualization. Yes, enabling Intel VT offers significant advantages, including improved performance, enhanced security, and better resource management for virtual machines. By enabling VT, you can run multiple operating systems and applications more efficiently on a single physical machine.
Consider the following benefits in detail:
2.1 Enhanced Performance
Intel VT reduces the overhead associated with virtualization by allowing the CPU to directly handle many of the tasks that would otherwise be performed by the virtualization software. According to a study by VMware, enabling VT can improve virtual machine performance by up to 30%. This means faster boot times, smoother application performance, and an overall more responsive virtual environment.
2.2 Improved Security
Virtual machines running with VT enabled are better isolated from each other and the host operating system. This isolation prevents malicious software running in one VM from affecting other VMs or the host system. Intel VT also provides hardware-based security features that can help protect against certain types of attacks, making your virtual environment more secure.
2.3 Better Resource Management
VT enables more efficient allocation and utilization of CPU resources among virtual machines. This ensures that each VM gets the resources it needs to perform optimally, without starving other VMs or impacting the host system. With VT, you can dynamically adjust resource allocation based on the needs of each VM, maximizing overall system efficiency.
2.4 Compatibility and Functionality
Many modern virtualization platforms, such as VMware, VirtualBox, and Hyper-V, require VT to be enabled for certain features to function correctly. Without VT, you may be limited in the types of virtual machines you can run or the features you can use. Enabling VT ensures that you can take full advantage of the capabilities offered by these platforms.
2.5 Real-World Applications
- Software Development: VT allows developers to create isolated environments for testing applications on different operating systems and configurations.
- Server Consolidation: VT enables businesses to consolidate multiple physical servers into fewer, more powerful machines, reducing hardware costs and simplifying management.
- Cloud Computing: VT is a fundamental technology in cloud computing, enabling providers to offer virtualized resources to customers on demand.
Enabling Intel VT is a straightforward process that can significantly improve the performance and security of your virtual environment. Whether you’re a developer, IT professional, or home user, taking the time to enable VT is well worth the effort.
3. How to Check if Intel VT is Enabled?
Before attempting to enable Intel VT, it’s essential to verify whether it’s already enabled on your system. Yes, checking if Intel VT is enabled can be done through the Task Manager in Windows or using command-line tools. This ensures you don’t waste time on a process that’s already complete.
Here’s how you can check:
3.1 Using Task Manager (Windows)
- Open Task Manager: Press
Ctrl + Shift + Escto open the Task Manager. - Navigate to the Performance Tab: Click on the “Performance” tab.
- Check CPU Information: Select “CPU” from the left-hand menu. Look for “Virtualization” in the CPU information section. If it says “Enabled,” VT is already active. If it says “Disabled,” you need to enable it in the BIOS settings.
 Task Manager showing Virtualization enabled
3.2 Using Command Prompt (Windows)
- Open Command Prompt as Administrator: Type
cmdin the search bar, right-click on “Command Prompt,” and select “Run as administrator.” - Enter Systeminfo Command: Type
systeminfoand press Enter. - Check Hyper-V Requirements: Look for the “Hyper-V Requirements” section. If “Virtualization Enabled in Firmware” is listed as “Yes,” VT is enabled. If it says “No,” you need to enable it in the BIOS.
3.3 Using PowerShell (Windows)
- Open PowerShell as Administrator: Type
powershellin the search bar, right-click on “PowerShell,” and select “Run as administrator.” - Enter Get-ComputerInfo Command: Type
Get-ComputerInfo | Select-String HypervisorPresentand press Enter. - Check Output: If the output shows “True,” it indicates that the Hyper-V hypervisor is present, which means VT is enabled. If no output is displayed, VT is likely disabled.
3.4 Linux
- Open Terminal: Launch the terminal application.
- Enter Command: Type
egrep -c '(vmx|svm)' /proc/cpuinfoand press Enter. - Check Output:
- If the output is
0, VT is not enabled. - If the output is greater than
0, VT is enabled. The number indicates the number of CPU cores that support VT.
- If the output is
3.5 macOS
macOS leverages virtualization technologies, but checking the status isn’t as straightforward as in Windows or Linux. Generally, if you’re running virtualization software like VMware Fusion or Parallels Desktop, and they are functioning correctly, VT is likely enabled.
By following these steps, you can quickly determine whether Intel VT is enabled on your system. If it’s disabled, proceed to the next section to learn how to enable it in your BIOS settings.
4. Step-by-Step Guide: How to Enable Intel VT in BIOS
Enabling Intel VT involves accessing your computer’s BIOS settings and making a few simple changes. Yes, enabling Intel VT in the BIOS is a straightforward process that requires restarting your computer and accessing the BIOS menu. This section provides a detailed, step-by-step guide to help you through the process.
4.1 Accessing BIOS Settings
-
Restart Your Computer: Shut down your computer and restart it.
-
Enter BIOS Setup: As your computer restarts, watch for a prompt that tells you which key to press to enter the BIOS setup. Common keys include
Del,F2,F12,Esc, orF10. The key varies depending on the motherboard manufacturer. Press the appropriate key repeatedly until the BIOS setup utility appears.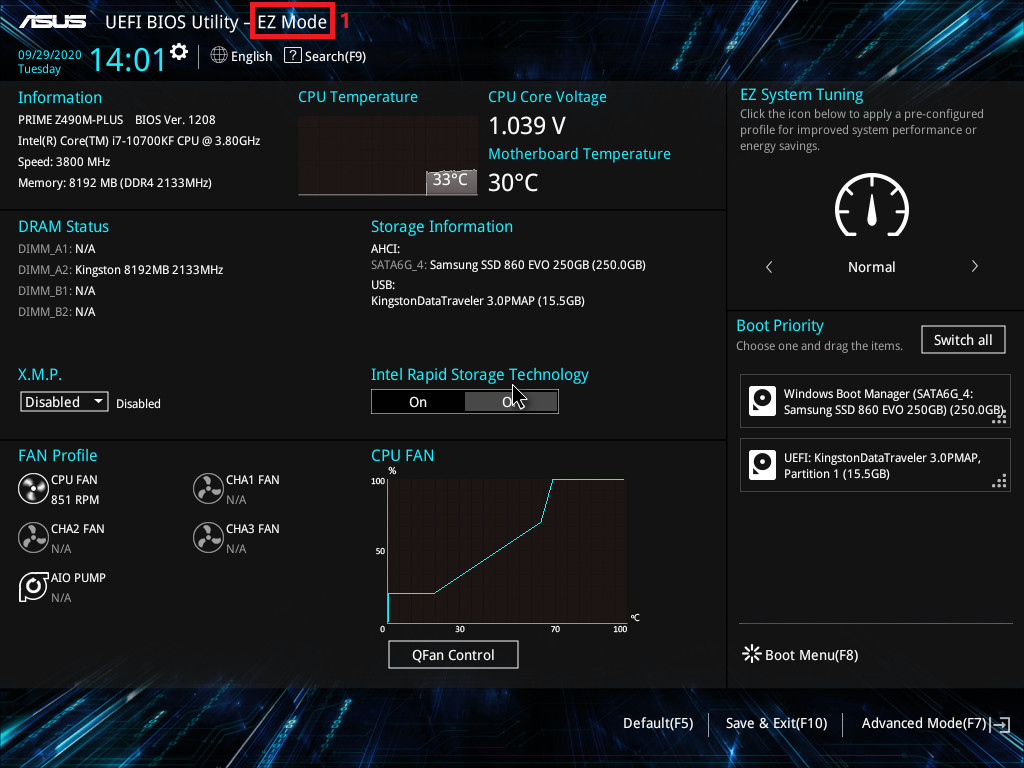 BIOS Entry Key Examples
4.2 Navigating to CPU Configuration
-
Navigate to Advanced Settings: Once in the BIOS setup, use the arrow keys to navigate to the “Advanced” or “Advanced Mode” section. The exact name may vary depending on your BIOS version.
-
Find CPU Configuration: Look for an option labeled “CPU Configuration,” “Processor Configuration,” or something similar. It might be under a section called “Chipset” or “Northbridge.”
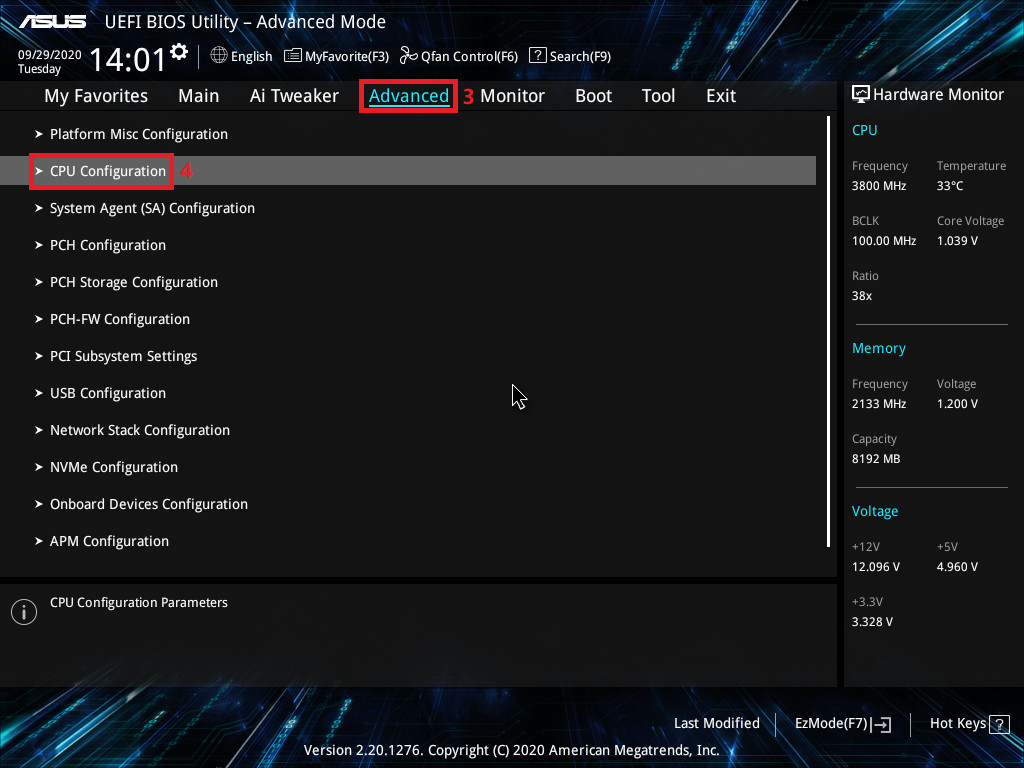 CPU Configuration in BIOS
4.3 Enabling Intel VT
-
Locate Virtualization Technology Option: In the CPU Configuration menu, look for an option labeled “Intel Virtualization Technology,” “VT-x,” “Virtualization,” or something similar.
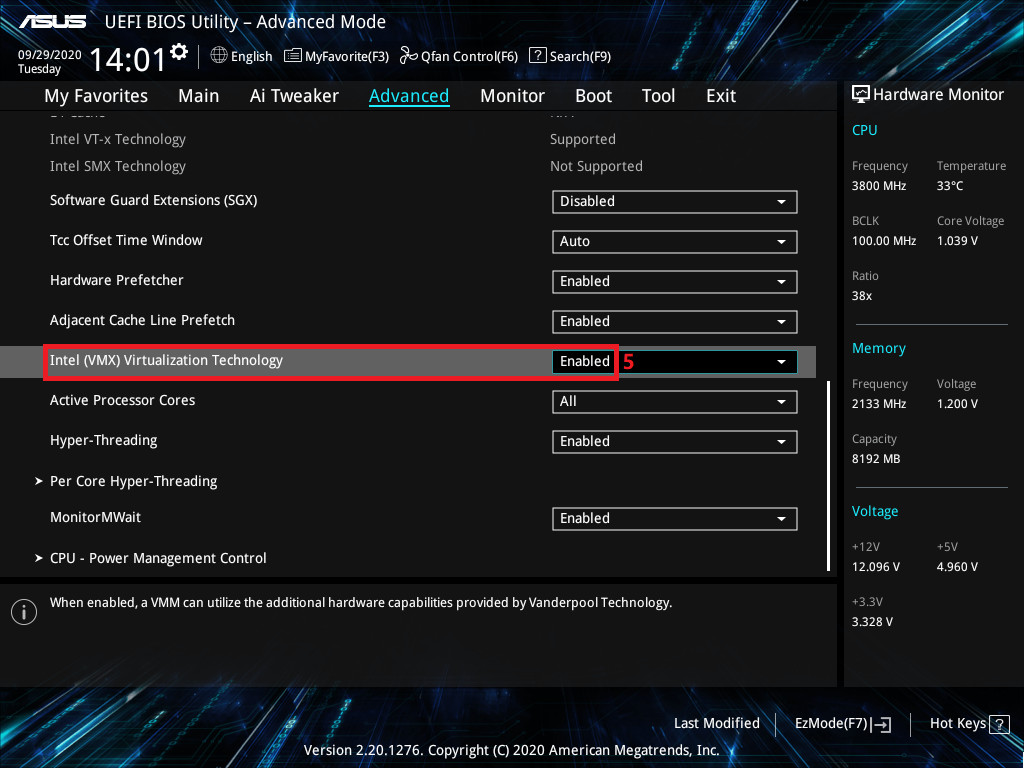 Intel VMX Virtualization Technology
 -
Enable Virtualization: If the option is set to “Disabled,” use the arrow keys to change it to “Enabled.”
4.4 Saving and Exiting BIOS
- Save Changes: Once you have enabled Intel VT, press the key indicated on the screen to save your changes and exit the BIOS setup. This is often
F10. - Confirm Save: A prompt may appear asking you to confirm that you want to save the changes. Select “Yes” or press the appropriate key to confirm.
- Restart Computer: Your computer will restart, and the changes will take effect.
4.5 Alternative Method for AMD Platforms
-
Access BIOS: Enter the BIOS setup as described earlier.
-
Navigate to CPU Configuration: Find the “CPU Configuration” section under the “Advanced” settings.
-
Enable SVM Mode: Look for “SVM Mode” (Secure Virtual Machine Mode) and set it to “Enabled.”
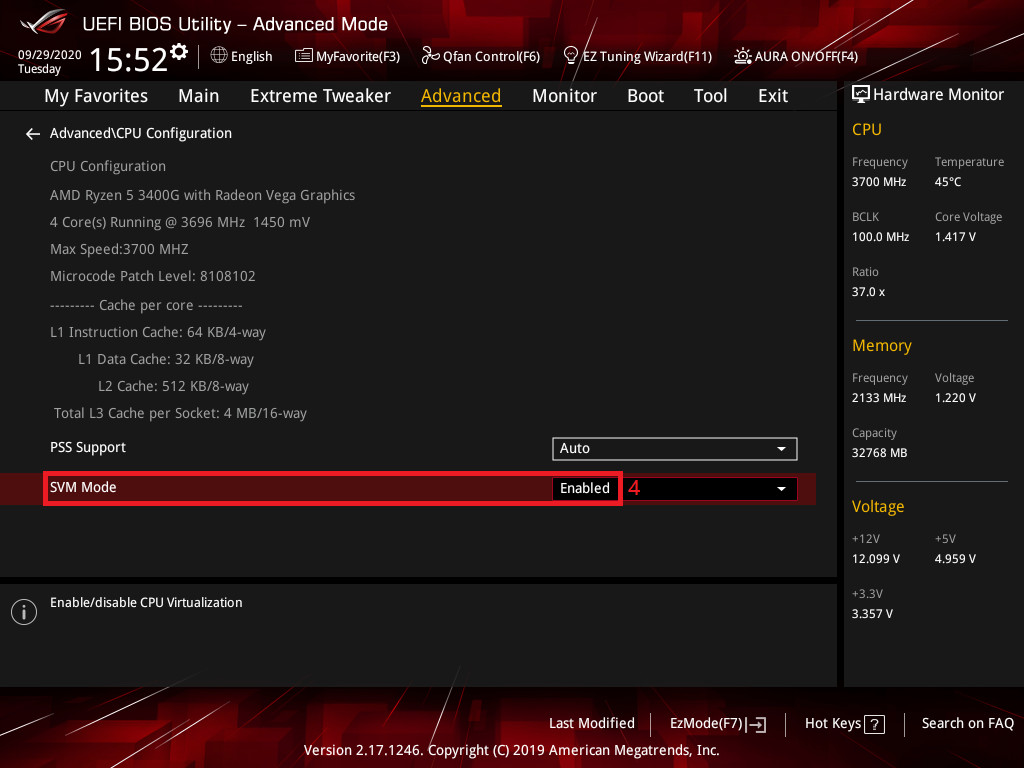 AMD SVM Mode
 -
Save and Exit: Save the changes and exit the BIOS setup.
4.6 Post-Enable Verification
After restarting your computer, verify that Intel VT is enabled by following the steps in Section 3. If it is still disabled, repeat the steps above to ensure you didn’t miss anything.
By following these step-by-step instructions, you can successfully enable Intel VT in your BIOS settings and unlock the full potential of your virtualization capabilities.
5. Enabling Hyper-V in Windows 10/11
Once Intel VT is enabled in the BIOS, you may need to enable Hyper-V in Windows to take full advantage of virtualization. Yes, enabling Hyper-V in Windows 10/11 allows you to create and manage virtual machines directly from your operating system. Here’s how to do it.
5.1 Steps to Enable Hyper-V
-
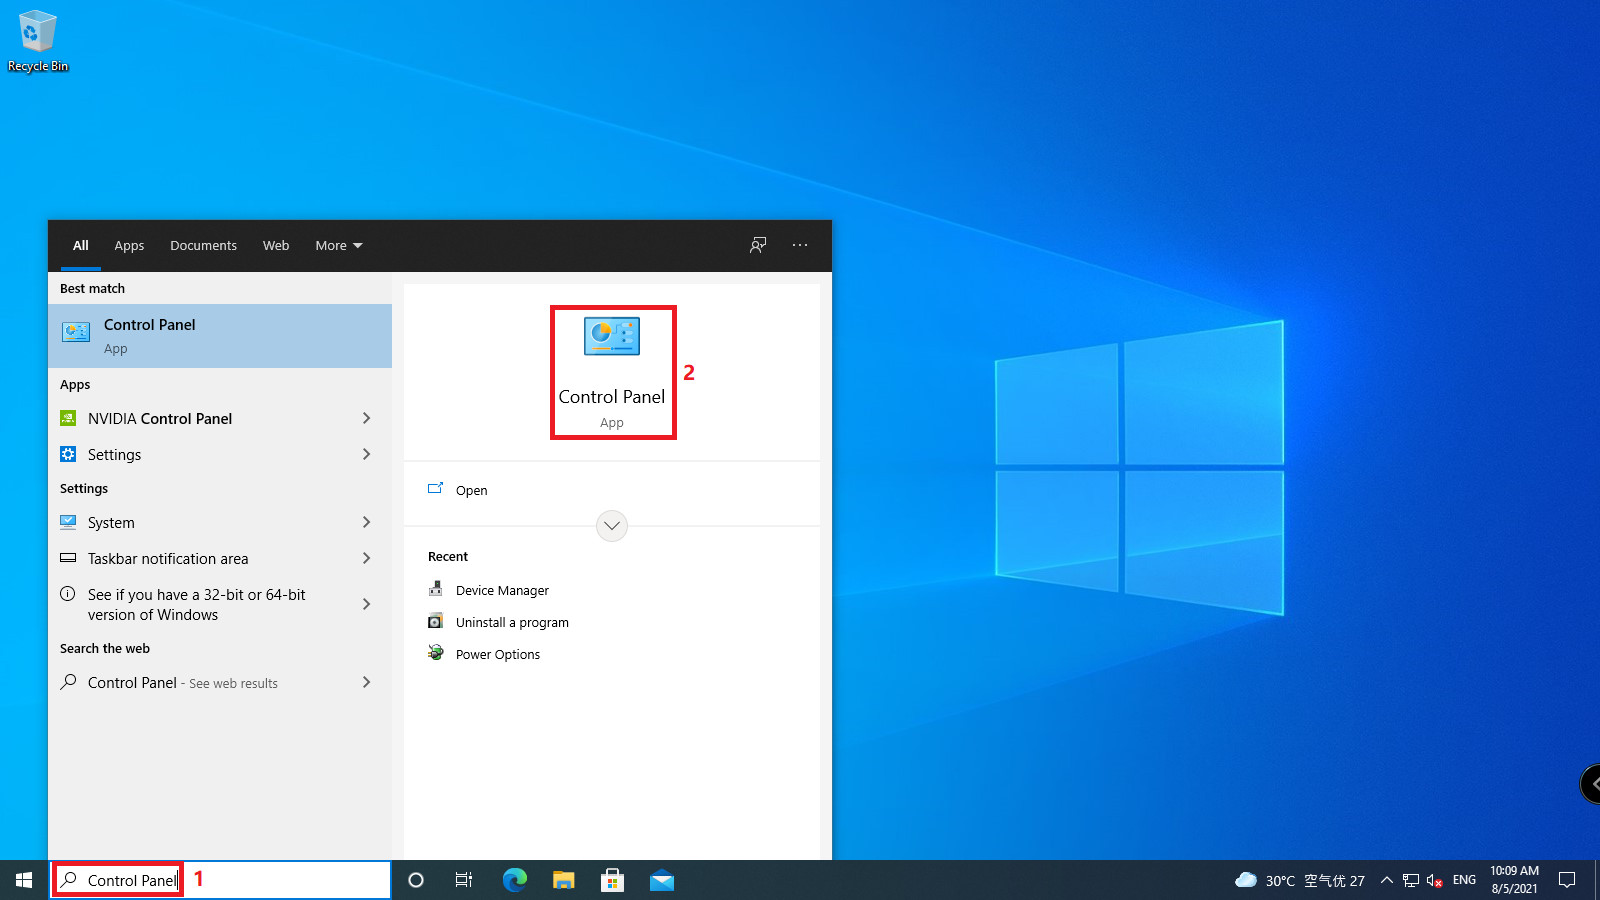
Open Control Panel:
- Click on the Start menu and type “Control Panel.”
- Select “Control Panel” from the search results.
Task Manager showing Virtualization enabled -
Navigate to Programs:
- In the Control Panel, click on “Programs.”
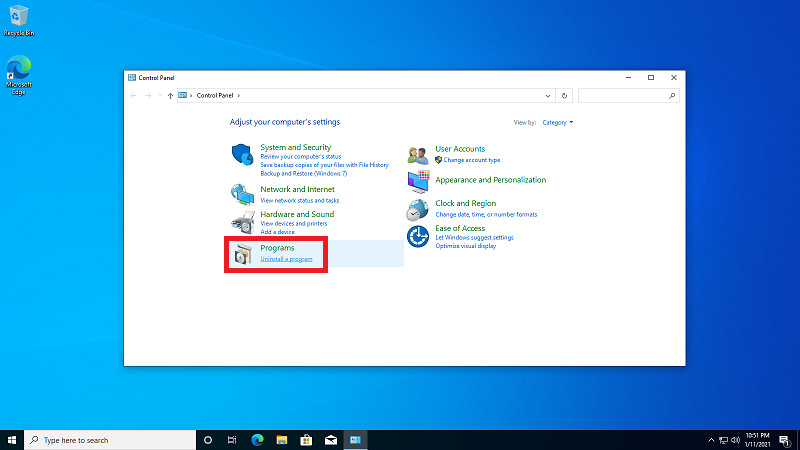 Click Uninstall a Program
 -
Turn Windows Features On or Off:
- Under “Programs and Features,” click on “Turn Windows features on or off.”
 Click Turn Windows Feature on or off
 -
Enable Hyper-V:
- In the “Windows Features” window, scroll down and find “Hyper-V.”
- Check the box next to “Hyper-V” to select it. This will also select any sub-components.
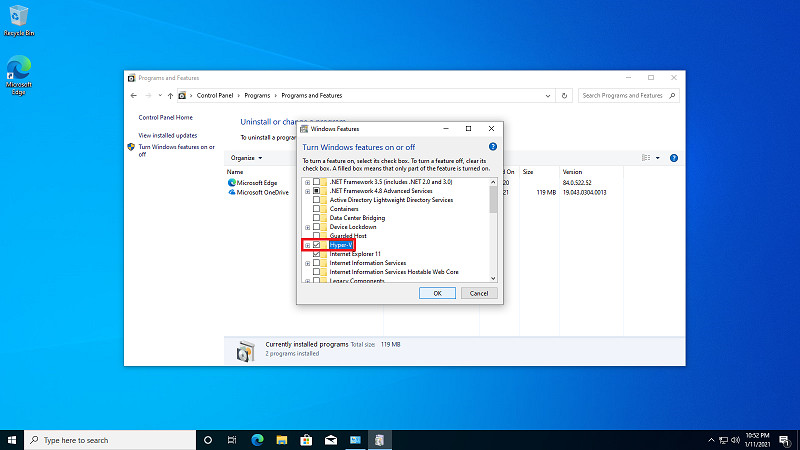 Mark Hyper-V and click OK to continue
 -
Click OK:
- Click “OK” to apply the changes. Windows will begin installing Hyper-V.
-
Restart Your Computer:
- After the installation is complete, you will be prompted to restart your computer. Click “Restart now” to complete the process.
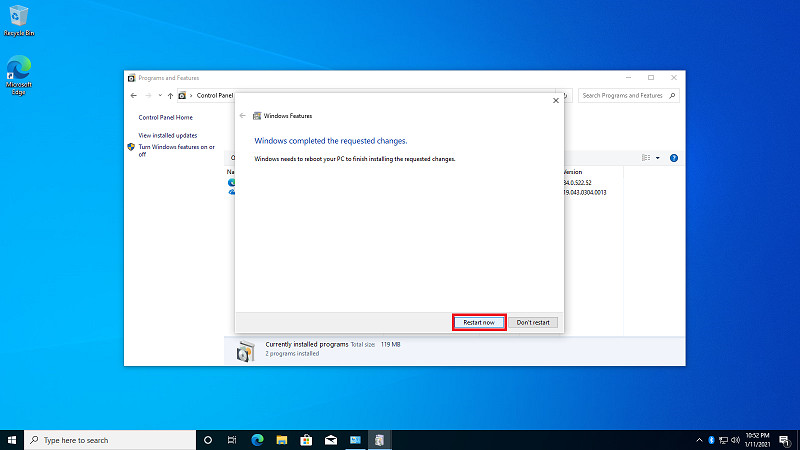 Click Restart now after installition
5.2 Accessing Hyper-V Manager
-
Open Windows Administrative Tools:
- Click the Start menu and select “Windows Administrative Tools.”
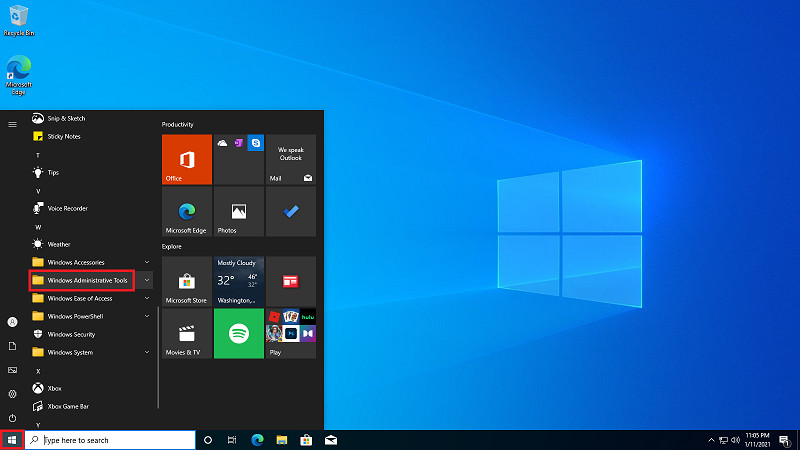 Click Windows start menu and select Windows Administrative Tools
 -
Select Hyper-V Manager:
- In the “Windows Administrative Tools” folder, click on “Hyper-V Manager.”
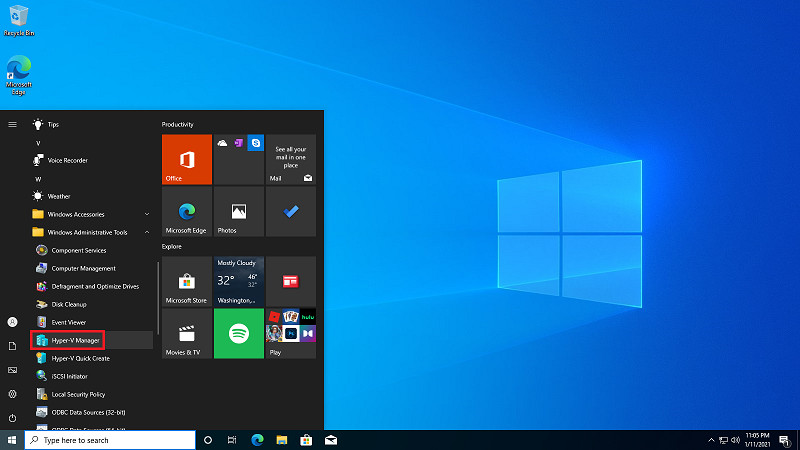 Click Hyper-V Manager
 -
Create a New Virtual Machine:
- In the Hyper-V Manager, right-click on your computer name in the left pane and select “New” -> “Virtual Machine.”
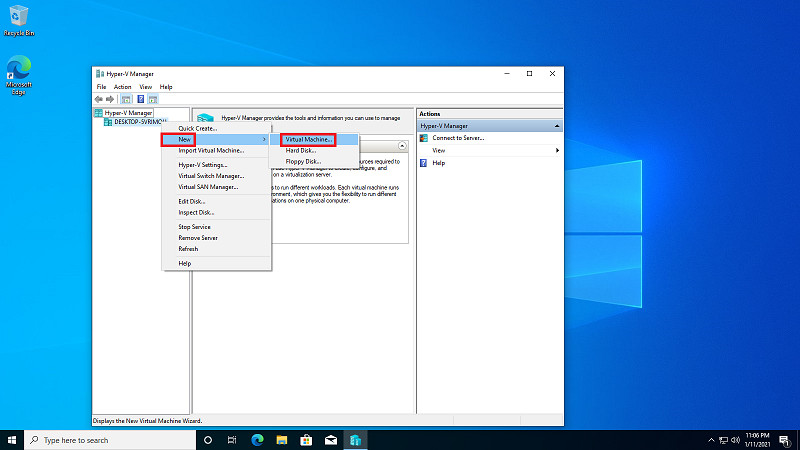 Right click and select New and select Virtual Machine
 -
Follow the Wizard:
- The “New Virtual Machine Wizard” will guide you through the process of creating a new virtual machine. Follow the prompts, specifying the name, memory, network, and hard drive settings for your virtual machine.
5.3 Configuring the Virtual Machine
-
Name and Generation:
- Enter a name for your virtual machine and choose the generation. Generation 1 is compatible with older operating systems, while Generation 2 supports more modern features.
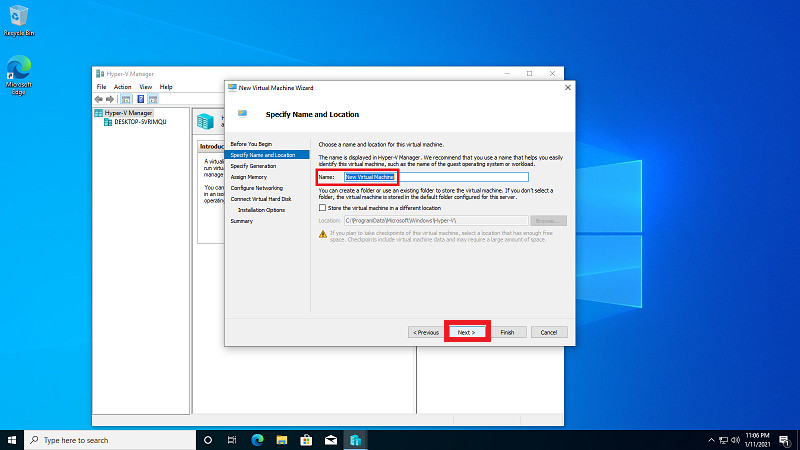 Set New Virtual Machine name and click Next
 Choose the generation of this virtual machine ,for example Generation 1
 -
Memory Allocation:
- Specify the amount of memory to allocate to the virtual machine. You can set it to use dynamic memory, which adjusts the memory allocation based on the needs of the VM.
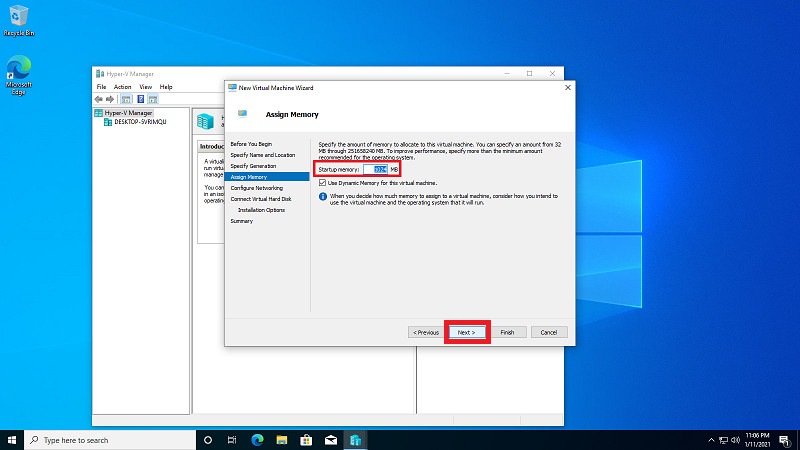 Set Startup memory size and click Next
 -
Network Configuration:
- Connect the virtual machine to a network. If you have a virtual switch configured, select it from the list. Otherwise, you can use the “Default Switch.”
 Set network connection to Default Switch and click Next
 -
Virtual Hard Disk:
- Create a virtual hard disk for the virtual machine. Specify the name, location, and size of the virtual hard disk file.
 Set Virtual Machine Name Location Size and Click Next
 -
Installation Options:
- Choose the installation source for the operating system. You can use an ISO image file or a physical DVD.
 Set Boot Image file and click Next
 -
Finish:
- Review the settings and click “Finish” to create the virtual machine.
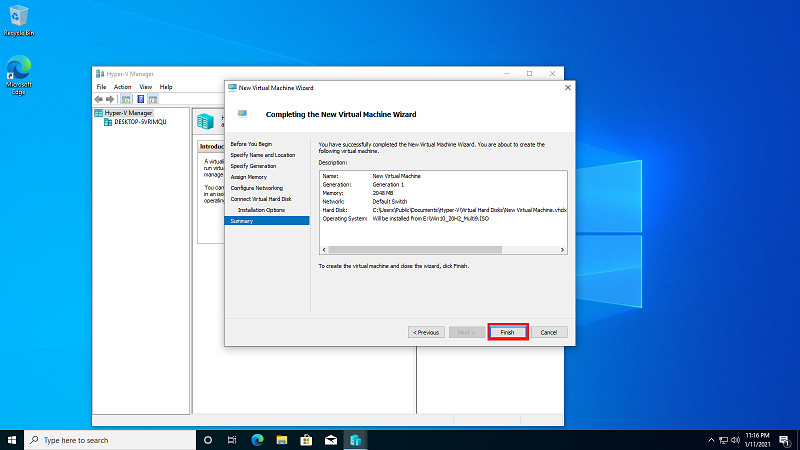 Click Finish
5.4 Installing the Operating System
-
Connect to the Virtual Machine:
- In the Hyper-V Manager, right-click on the newly created virtual machine and select “Connect.”
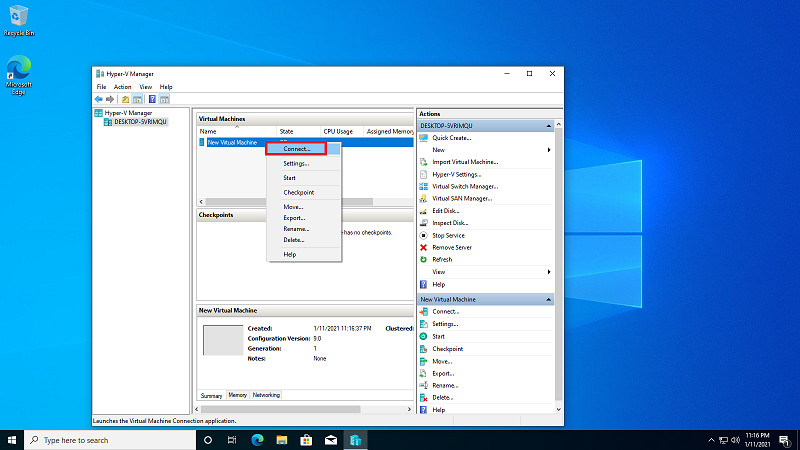 Right click New Virtual Machine and select Connect
 -
Start the Virtual Machine:
- Click the “Start” button in the Virtual Machine Connection window to start the virtual machine.
-
Follow the Installation Prompts:
- The virtual machine will boot from the installation source you specified, and you can follow the prompts to install the operating system.
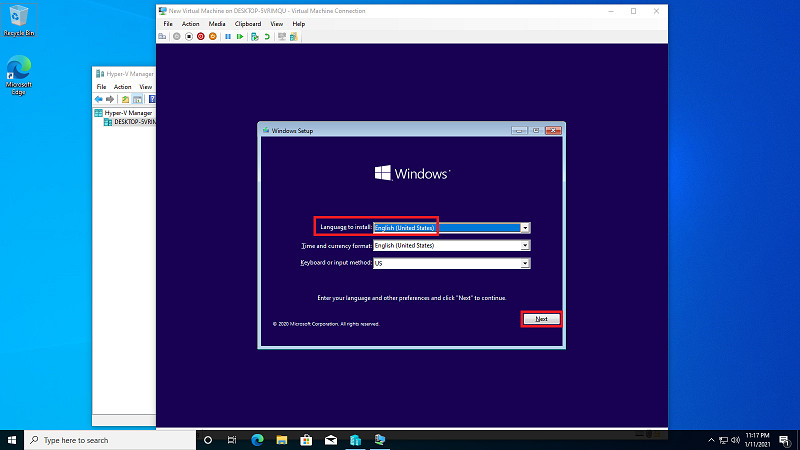 Select install language and click Next
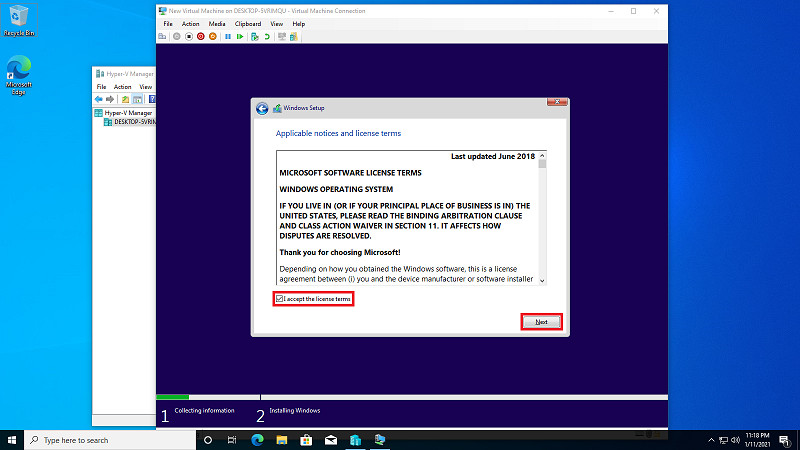 Mark I accept the license terms and click Next
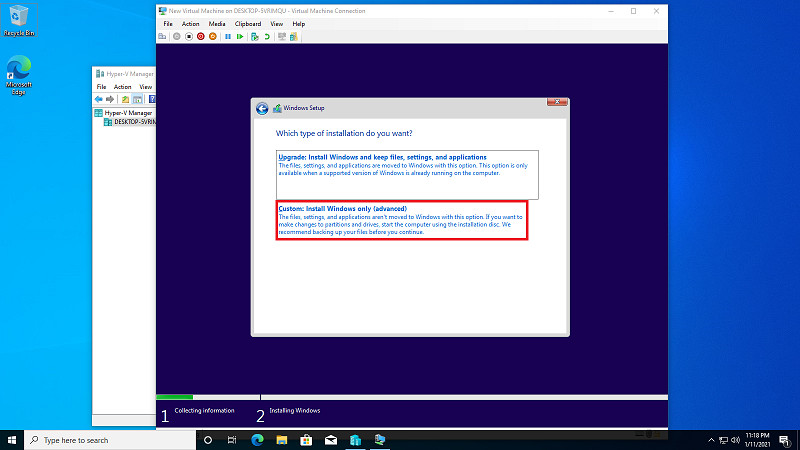 Select Custom: Install Windows only(advanced)
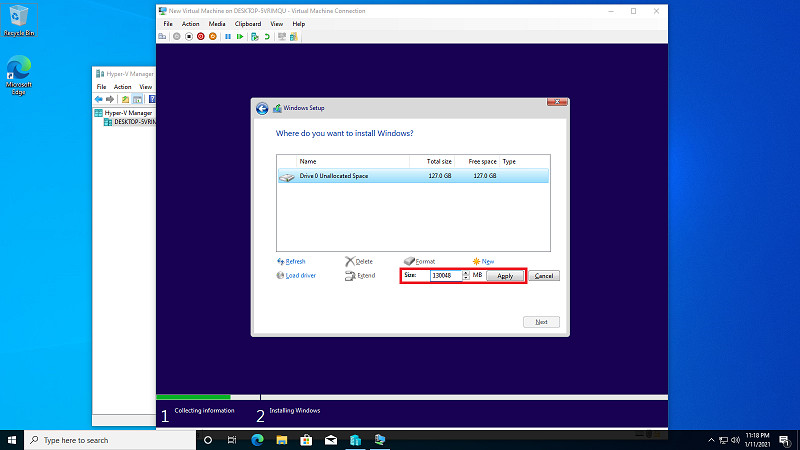 Set the Size and click Apply
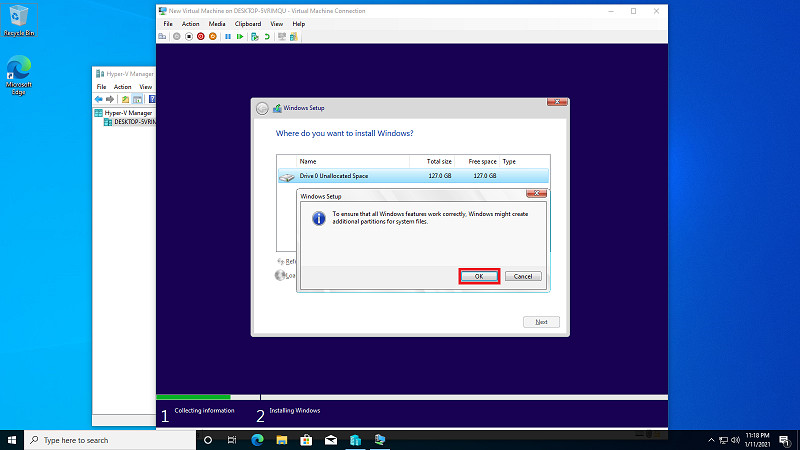 Click OK
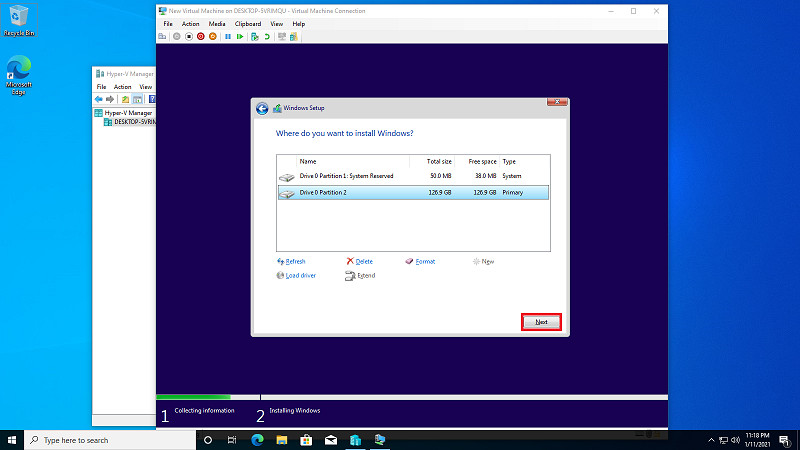 Click Next
 Wait Installing
 -
Complete the Installation:
- Once the installation is complete, you can start using your new virtual machine.
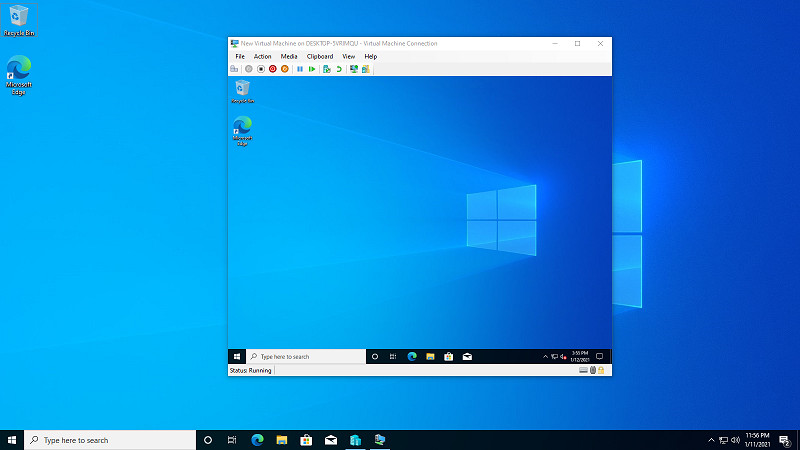 Open Virtual Machine after installation
By following these steps, you can successfully enable Hyper-V in Windows 10/11 and create and manage virtual machines on your system.
6. Troubleshooting Common Issues
Enabling Intel VT can sometimes present challenges. Yes, troubleshooting common issues when enabling Intel VT often involves checking BIOS settings, ensuring compatibility, and updating drivers. Here are some common problems and their solutions:
6.1 VT Option Not Found in BIOS
- Problem: The Intel Virtualization Technology option is not listed in the BIOS settings.
- Solution:
- Update BIOS: Ensure you have the latest BIOS version installed. Check your motherboard manufacturer’s website for updates and follow their instructions for updating the BIOS.
- Check CPU Compatibility: Verify that your CPU supports Intel VT. Refer to Intel’s product specifications for your CPU model.
- Reset BIOS to Default Settings: Sometimes, incorrect BIOS settings can hide the VT option. Reset the BIOS to default settings and try again.
6.2 VT is Enabled, But Virtual Machines Still Don’t Work
- Problem: Intel VT is enabled in the BIOS, but virtual machines are still not functioning correctly.
- Solution:
- Enable Hyper-V (Windows): Make sure Hyper-V is enabled in Windows Features. Follow the steps in Section 5 to enable Hyper-V.
- Check Virtualization Software Settings: Ensure that your virtualization software (e.g., VMware, VirtualBox) is configured to use hardware virtualization.
- Update Drivers: Update your chipset and processor drivers. Outdated drivers can sometimes cause compatibility issues with virtualization.
6.3 Error Messages During VM Creation
- Problem: Error messages appear when creating or running virtual machines.
- Solution:
- Insufficient Resources: Ensure your system has enough RAM and disk space to run the virtual machine. Allocate sufficient resources to the VM.
- Conflicting Software: Some software, such as antivirus programs, can interfere with virtualization. Try disabling such software temporarily to see if it resolves the issue.
- Check Event Logs: Review the Windows Event Logs for any error messages related to virtualization. This can provide more specific information about the problem.
6.4 Performance Issues with Virtual Machines
- Problem: Virtual machines are running slowly or experiencing performance issues.
- Solution:
- Allocate More Resources: Increase the amount of RAM and CPU cores allocated to the virtual machine.
- Optimize Virtual Hard Disk: Use a fixed-size virtual hard disk instead of a dynamically expanding one. This can improve performance.
- Disable Unnecessary Services: Disable unnecessary services and applications running in the virtual machine to free up resources.
6.5 Compatibility Issues with Older Operating Systems
- Problem: Older operating systems are not compatible with Hyper-V or other virtualization platforms.
- Solution:
- Use Generation 1 VMs: When creating a new virtual machine, choose Generation 1 for better compatibility with older operating systems.
- Install Compatibility Updates: Check for and install any compatibility updates for the guest operating system.
- Consider Alternative Virtualization Software: If Hyper-V is not compatible, try using alternative virtualization software like VMware or VirtualBox.
By addressing these common issues, you can ensure a smooth and efficient virtualization experience with Intel VT.
7. Security Considerations When Using Intel VT
While Intel VT enhances virtualization capabilities, it’s essential to consider the security implications. Yes, understanding and addressing security considerations when using Intel VT is crucial to protect your system and data. Here are some key points to keep in mind:
7.1 Isolation of Virtual Machines
- Importance: Proper isolation is fundamental to ensuring that virtual machines do not interfere with each other or the host system.
- Best Practices:
- Use Strong Passwords: Implement strong, unique passwords for each virtual machine.
- Keep VMs Updated: Regularly update the operating systems and applications running in the virtual machines to patch security vulnerabilities.
- Network Segmentation: Segment your virtual network to isolate sensitive virtual machines from less secure ones.
7.2 Hypervisor Security
- Importance: The hypervisor is the foundation of your virtualization environment, and its security is paramount.
- Best Practices:
- Keep Hypervisor Updated: Regularly update the hypervisor software to patch security vulnerabilities.
- Monitor Hypervisor Activity: Monitor the hypervisor for suspicious activity and unauthorized access attempts.
- Implement Access Controls: Restrict access to the hypervisor to authorized personnel only.
7.3 Data Protection
- Importance: Protecting the data stored in virtual machines is critical.
- Best Practices:
- Encryption: Encrypt the virtual hard disks of your virtual machines to protect sensitive data.
- Backup and Recovery: Implement a robust backup and recovery plan to ensure that you can restore your virtual machines in case of a disaster.
- Data Loss Prevention (DLP): Use DLP tools to monitor and prevent sensitive data from leaving the virtual environment.
7.4 Secure Configuration
- Importance: Properly configuring your virtualization environment is essential to minimize security risks.
- Best Practices:
- Disable Unnecessary Features: Disable any unnecessary features or services in the virtual machines to reduce the attack surface.
- Use Secure Templates: Create secure virtual machine templates that are pre-configured with security best practices.
- Regular Security Audits: Conduct regular security audits of your virtualization environment to identify and address potential vulnerabilities.
7.5 Monitoring and Logging
- Importance: Monitoring and logging are essential for detecting and responding to security incidents.
- Best Practices:
- Centralized Logging: Implement centralized logging to collect and analyze logs from all virtual machines and the hypervisor.
- Intrusion Detection: Use intrusion detection systems (IDS) to monitor network traffic and system activity for suspicious patterns.
- Security Information and Event Management (SIEM): Use SIEM tools to correlate security events and identify potential security incidents.
By implementing these security considerations, you can create a more secure virtualization environment with Intel VT and protect your systems and data from potential threats.
8. The Future of Virtualization Technology
Virtualization technology continues to evolve, driven by advancements in hardware and software. Yes, the future of virtualization technology points towards greater integration with cloud computing, enhanced security features, and improved performance. Understanding these trends can help you prepare for the next generation of virtualization.
8.1 Cloud Integration
- Trend: Virtualization is becoming increasingly integrated with cloud computing platforms.
- Implication: Businesses can seamlessly move virtual machines between on-premises environments and the cloud, enabling hybrid cloud solutions.
- Example: VMware Cloud on AWS allows organizations to run VMware-based virtual machines on Amazon Web Services, providing a consistent infrastructure across both environments.
8.2 Containerization
- Trend: Containerization technologies like Docker and Kubernetes are gaining popularity as an alternative to traditional virtualization.
- Implication: Containers offer a lightweight and efficient way to package and deploy applications, making them ideal for microservices architectures.
- Example: Docker allows developers to create portable containers that can run consistently across different environments, while Kubernetes provides orchestration and management for containerized applications.
8.3 Enhanced Security
- Trend: Security is becoming an increasingly important focus in virtualization technology.
- Implication: New security features are being developed to protect virtual machines from malware and other threats.
- Example: Intel Software Guard Extensions (SGX) allows applications to run in secure enclaves, protecting sensitive data from unauthorized access, even if the system is compromised.
8.4 Improved Performance
- Trend: Virtualization technology is continually improving in terms of performance and efficiency.
- Implication: Virtual machines can now run workloads that were previously only possible on physical servers.
- Example: NVMe over Fabrics (NVMe-oF) enables virtual machines to access high-performance storage devices over a network, improving storage performance for virtualized applications.
8.5 Edge Computing
- Trend: Virtualization is expanding to edge computing environments, bringing computing resources closer to the data source.
- Implication: Businesses can process data locally at the edge, reducing latency and improving the performance of applications.
- Example: VMware Edge Compute Stack allows organizations to run virtual machines and containers at the edge, enabling use cases such as industrial automation and autonomous vehicles.
By staying informed about these trends, you can leverage the latest virtualization technologies to improve the efficiency, security, and performance of your IT infrastructure.
9. Intel VT and Gaming: What You Need to Know
For gamers, Intel VT can open up new possibilities, but it’s essential to understand its role and limitations. Yes, while Intel VT is primarily used for virtualization, it can indirectly benefit gaming by enabling better performance in certain scenarios. Here’s what gamers need to know:
9.1 Running Multiple Game Instances
- Use Case: Gamers may want to run multiple instances of a game simultaneously, for example, to manage multiple accounts or test different strategies.
- Benefit: Intel VT allows you to run multiple virtual machines, each with its own instance of the game. This can be useful for certain types of games, but it requires significant system resources.
- Consideration: Ensure your system has enough RAM, CPU cores, and a powerful graphics card to handle multiple game instances.
9.2 Testing Mods and Custom Content
- Use Case: Gamers often want to test mods and custom content in a safe environment without risking their main game installation.
- Benefit: Intel VT allows you to create a virtual machine where you can test mods and custom content without affecting your primary system.
- Consideration: This provides a safe and isolated environment to experiment with game modifications.
9.3 Improving Game Performance
- Use Case: In some cases, enabling Intel VT can improve the overall performance of games.
- Benefit: VT can help optimize resource allocation and reduce overhead, leading to smoother gameplay and faster loading times.
- Consideration: The performance benefits may vary depending on the game and your system configuration.
9.4 Potential Drawbacks
- Resource Intensive: Running virtual machines for gaming can be resource-intensive, potentially impacting the performance of the host system.
- Compatibility Issues: Some games may not be fully compatible with virtualized environments, leading to graphical glitches or other issues.
- Increased Complexity: Setting up and managing virtual machines can be complex, requiring technical knowledge and expertise.
9.5 Alternative Solutions
- Dual Booting: Consider dual booting if you want to run games in a native environment without the overhead of virtualization.
- Game Emulators: Use game emulators for playing older games that are not compatible with modern systems.
While Intel VT can offer certain benefits for gaming, it’s essential to weigh the advantages and disadvantages carefully. Ensure your system is capable of handling the resource requirements, and be prepared for potential compatibility issues.
10. Frequently Asked Questions (FAQ)
Here are some frequently asked questions about enabling Intel VT:
10.1 What is the difference between Intel VT-x and VT-d?
Intel VT-x (Virtualization Technology) enhances CPU virtualization, allowing the CPU to handle virtualization tasks more efficiently. VT-d (Virtualization Technology for Directed I/O) improves I/O virtualization, enabling virtual machines to directly access hardware resources.
10.2 Does enabling Intel VT affect system performance when not running VMs?
No, enabling Intel VT typically does not significantly affect system performance when not running virtual machines. The feature only comes into play when virtualization is actively used.
10.3 Can I enable Intel VT on any CPU?
No, not all CPUs support Intel VT. You need to check the specifications of your CPU to ensure it supports virtualization technology. Visit Intel’s website and search for your CPU model to verify.
10.4 Is it safe to enable Intel VT?
Yes, it is generally safe to enable Intel VT. However, ensure you follow security best practices for your virtual machines to protect your system from potential threats.
10.5 How do I disable Intel VT if needed?
You can disable Intel VT by accessing the BIOS settings and changing the “Intel Virtualization Technology” option from “Enabled” to “Disabled.” Save the changes and exit the BIOS.
10.6 What virtualization software works best with Intel VT?
Popular virtualization software options that work well with Intel VT include VMware Workstation, Oracle VirtualBox, and Microsoft Hyper-V. Choose the one that best fits your needs and system requirements.
10.7 Do I need Intel VT to run Docker containers?
While Docker can run without Intel VT in some configurations, enabling VT can improve performance and compatibility, especially when running Hyper-V-based containers on Windows.
10.8 Can I enable Intel VT remotely?
No, you cannot enable Intel VT remotely because it requires accessing the BIOS settings, which can only be done locally during system startup.