Is your Pioneer mini-hifi system, like the X-HM71 or X-HM81, or perhaps an amplifier such as the X-HM20, suddenly unresponsive? Do you see a persistent flashing red or blue light on the front panel, and it simply refuses to power on? You’re not alone, and thankfully, it’s likely not a terminal issue.
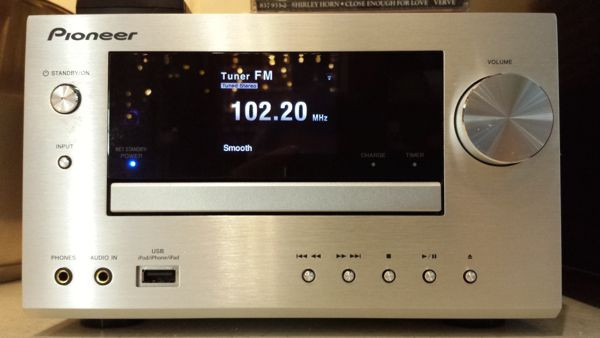 Pioneer X-HM71-S mini-hifi system, highlighting the timer display, often affected by a flashing timer light fault
Many Pioneer X-HM series owners have encountered this frustrating problem. The good news is that for many, resolving this “Timer Pioneer” issue is surprisingly straightforward and doesn’t necessitate replacing your entire system. You might be able to fix it yourself without needing professional repair. (For X-HM20 and X-HM-10 models, a simple unplugging might be all that’s needed, as noted in user comments).
However, the frustrating part is that Pioneer’s official documentation provides absolutely no guidance on this specific flashing light scenario. The instruction manual is silent on the matter, leaving many users feeling stranded and assuming their device is broken beyond repair. This lack of information might lead some to prematurely replace their Pioneer system, potentially even choosing another Pioneer product. However, before you consider that, understand why this happens and how you can likely fix it yourself.
Understanding the Pioneer Fault (Timer Light Issue)
The blinking red timer light, or sometimes blue, and the system’s refusal to power on typically indicate that your Pioneer mini-hifi has entered a fault state. In many cases, this is triggered by the system’s overload protection software. This protection mechanism, while designed to safeguard your device, can sometimes be overly sensitive and lock the unit into a permanent fault condition. Simply turning the power off and on again won’t reset it. Online searches might suggest holding down various button combinations upon startup, but these often prove ineffective for this particular issue.
Initially, when faced with this problem, taking the unit to a certified Pioneer service center seemed like the only option. These workshops can indeed reset the fault code. Pioneer’s rationale for this service-center reset is that a technician should inspect for potential damage before resetting, ensuring no underlying issues could cause further harm. Service centers might imply that user error, such as incorrect speaker wiring or short circuits, is the likely cause, suggesting the overload protection is infallible. Consumers might then feel responsible and pay the service fee without further questioning.
However, repeated instances of this issue across multiple units in different setups, all wired correctly, raise questions about the root cause and whether user error is always to blame. This led to direct communication with Pioneer UK to seek clarification.
Pioneer’s Response and Speaker Impedance Misdirection
Pioneer’s initial response attempted to deflect blame by suggesting incompatibility with aftermarket speakers. They recommended using only the speakers originally supplied with the X-HM71, dismissing the use of higher-quality speakers like JPW or Gale Gold Monitors as unsuitable. This suggestion was particularly frustrating given the generally acknowledged inferior quality of the bundled Pioneer speakers.
While acknowledging that Pioneer does produce some excellent speakers, the ones included with the X-HM71 were not in that category, evident by their lightweight construction. Pioneer requested impedance curves for the 20-year-old JPW and Gale Gold Monitor speakers, seemingly to validate their speaker incompatibility theory. However, finding manufacturer-provided impedance curves for such vintage speakers is often impossible. Therefore, impedance measurements were taken and provided to Pioneer.
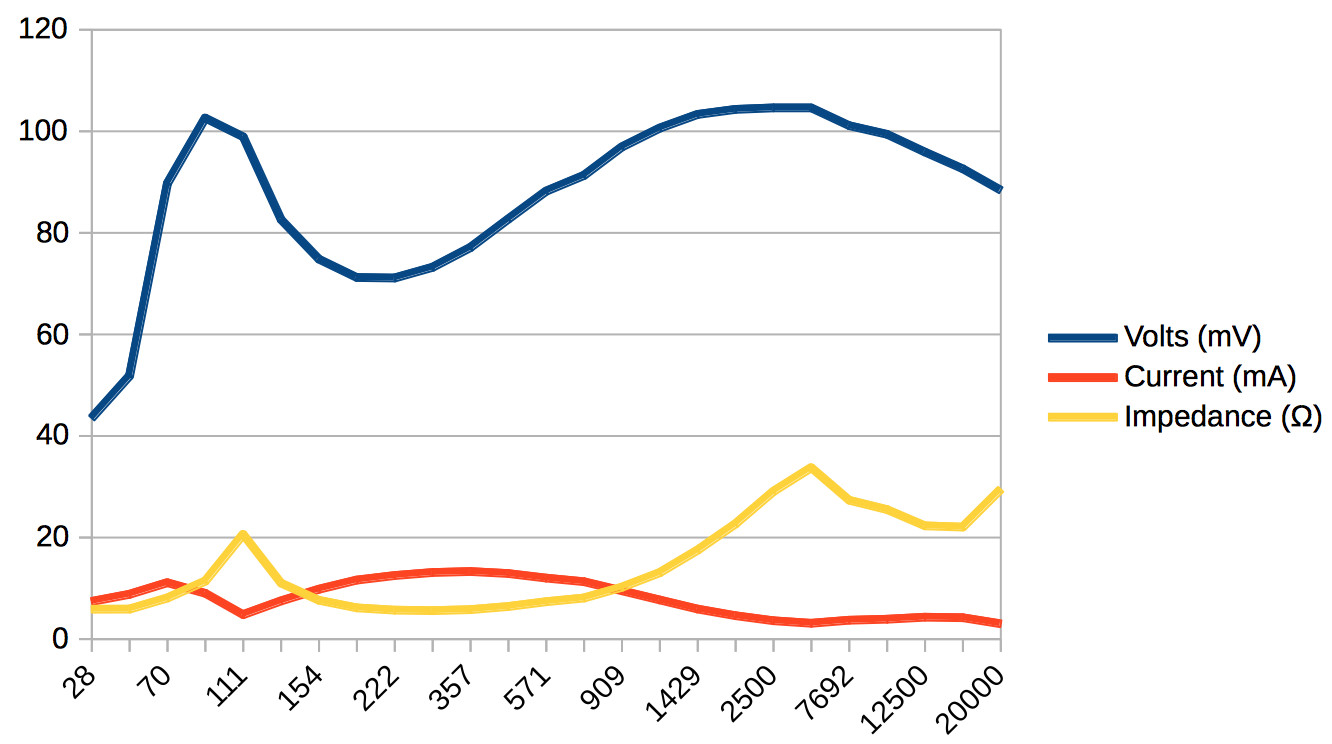 Impedance curve measurement of JPW Gold Monitor speakers, showing compatibility and refuting Pioneer's initial speaker blame for the system fault.
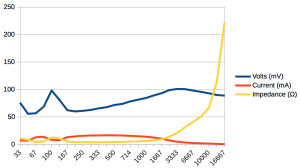 Impedance curve measurement of Gale Gold Monitor speakers, demonstrating they are not the cause of the Pioneer system fault.
Upon reviewing the impedance curves, Pioneer conceded that the speakers were not the source of the problem. The cost to reset each X-HM71 at a service center was £30, a recurring expense after the 12-month warranty expired. One unit failed again shortly after repair, leading to a full refund request instead of further service.
The underlying cause of the protection circuit tripping remained unclear, and Pioneer’s explanation was vague:
The protection circuit can activate by several methods. The timer light will flash in a particular timing sequence to indicate to an engineer what area the fault is in. Some are recoverable by the end user just by pressing the power button again. Other more serious errors, that can cause permanent damage, are not recoverable by the end user. This has been done to stop the user from trying to turn the unit back on and causing more substantial damage. The method to de-activate this protection is only available to engineers who can check the relevant circuit area for damage, and if all is ok, they can release the protection without fear of further damage.
This explanation lacks clarity and doesn’t provide actionable information for the user.
The Technical Reason: Class D Amplifiers and Protection
Modern mini-hifi systems like the Pioneer X-HM series often employ Class D amplifiers. Unlike older Class A or A/B amplifiers, Class D amplifiers are more efficient and cost-effective to manufacture. They operate by rapidly switching on and off at high frequencies, effectively modulating the pulse width to represent the audio signal. This switching action, after filtering, delivers the audio signal to the speakers.
The efficiency of Class D amplifiers comes with a trade-off. If the switching process is disrupted, particularly due to speaker connection issues like short circuits, the output transistors can fail quickly. Therefore, manufacturers like Pioneer incorporate sophisticated protection circuits to monitor the amplifier and shut it down at the first sign of a problem, preventing potentially costly damage. Traditional fuses might be too slow to react in such scenarios.
However, a key question arises: why can’t this protection circuit be designed to reset upon a power cycle or automatically recover if the fault condition is no longer present? A persistent short circuit would understandably trigger the protection repeatedly. But a transient glitch or power surge that momentarily trips the protection could ideally resolve itself upon restart. The design choice to create a permanent, user-unresettable fault state seems unnecessarily restrictive and user-unfriendly. At the very least, informing users about the flashing light’s meaning and a potential reset procedure would significantly improve user experience.
Pioneer’s reasoning for not disclosing the meaning of the flashing light is:
Remember that the flashing light on these products can mean various different things, some recoverable and some not depending on the timing’s. Also most of our products will have a form of indication when a problem occurs, and these lights will mean totally different things. There is no generic indication.
This justification is weak and leaves users with a seemingly broken product and a repair bill for a fault that may not represent any actual hardware damage. It highlights a potential design flaw or, at best, a significant oversight in user communication and product usability.
How to Reset Your Timer Pioneer System – Step-by-Step Guide
Fortunately, thanks to insights from users like Prassel and Martin (in the comments of the original article), a user-accessible reset method exists for the X-HM71 and X-HM81 models. Before attempting this reset, it’s crucial to double-check your speaker wires to ensure there are no short circuits on either the left or right channels.
Here’s how to reset the fault:
- Locate the buttons: On the front panel of your Pioneer X-HM71 or X-HM81 system, identify the “STANDBY/ON” button and the “STOP” button.
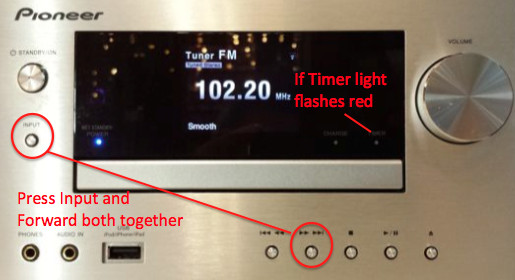 Button combination for resetting the fault on Pioneer X-HM71 and X-HM81 mini-hifi systems, pressing STANDBY/ON and STOP simultaneously.
- Press and hold: Simultaneously press and hold the “STANDBY/ON” button and the “STOP” button.
- Observe: Keep holding the buttons down for a few seconds. The system should reset, and the flashing timer light should stop.
- Power on: Attempt to power on your Pioneer system as usual. It should now function normally.
For Pioneer X-HM10 and X-HM20 models:
If the button reset doesn’t work, or if you have an X-HM10 or X-HM20, simply try this:
- Unplug: Disconnect the power cord from the back of the Pioneer unit.
- Wait: Wait for at least 5 minutes.
- Plug back in: Reconnect the power cord.
- Power on: Try turning on your system. The fault condition should be cleared.
Conclusion
The flashing timer light issue on Pioneer mini-hifi systems, while alarming, is often due to an overly sensitive overload protection circuit rather than a genuine hardware failure. While Pioneer’s official stance and lack of user information are disappointing, a simple reset procedure, either via button combination or unplugging, can often resolve the problem. By understanding the potential cause and utilizing these reset methods, you can likely revive your “timer pioneer” system and avoid unnecessary repair costs or premature replacement.